Establishing a connection to Wi-Fi networks can sometimes be a tiresome task, particularly when faced with long & intricate passwords. Near Field Communication (NFC) technology provides a simple solution, enabling users to connect to Wi-Fi networks with a mere tap of their NFC-enabled devices on an NFC tag.
This extensive guide will walk you through the entire process of programming NFC tags for Wi-Fi connection, ensuring that it is effortlessly comprehensible and accessible to everyone.
Requirements
- An NFC-enabled smartphone or device.
- Blank, writable NFC tags (preferably NTAG213 or NTAG215 for compatibility and storage capacity).
- An NFC tag-writing app (installed on your smartphone or device).
Step-by-Step Guide
Step 1: Gather Wi-Fi Network Information
Initially, you must have all the essential information about the Wi-Fi network, including:
- Network name (SSID)
- Password (if applicable)
- Security type (WPA2, WEP, or Open)
Ensure you have this information, as you will require it during the NFC tag programming process.
Step 2: Install an NFC Tag-Writing App
To program the NFC tag, you need to have an NFC tag-writing app installed on your NFC-enabled smartphone. There are numerous free & paid apps available for both Android & iOS platforms. Some popular options are:
- NFC Tools (Android)
- NFC TagWriter by NXP (Android)
- Simply NFC (iOS)
Download and install your ideal application.
Step 3: Launch the NFC Tag-Writing App
Once you have successfully installed the NFC tag-writing app, open it on your smartphone or device. The app’s interface might vary slightly depending on the chosen app, but the general process should remain similar.
Step 4: Create a New Wi-Fi Record
Within the NFC tag-writing app, look for the option to create a new record or task. This is where you will input the Wi-Fi network information collected in Step 1. Select the Wi-Fi or Connect to Wi-Fi option (the phrasing may vary depending on the app) to create a new Wi-Fi record.
Step 5: Enter Wi-Fi Network Information
Now, enter the Wi-Fi network information gathered earlier:
- In the SSID or Network Name field, input the network name.
- In the Password or Key field, type the network password (if applicable).
- For the Security or Encryption field, choose the appropriate security type (WPA2, WEP, or Open).
Double-check that all the information you’ve provided is accurate, then proceed.
Step 6: Save the Wi-Fi Record
Once you have entered all the necessary Wi-Fi network information, save the record in the app. This will prepare the data for writing onto the NFC tag.
Step 7: Prepare the NFC Tag for Writing
Now, it’s time to write the Wi-Fi record onto the NFC tag. Ensure that the NFC tag is blank and writable. If you are uncertain, most NFC tag-writing apps have a feature that allows you to verify if a tag is writable and erase any existing data.
Place the NFC tag on a flat surface, making certain that no metallic objects are nearby as they can interfere with the NFC signal.
Step 8: Write the Wi-Fi Record onto the NFC Tag
Within the NFC tag-writing app, locate the option to write or save the data onto the tag. This may be labeled as Write, Save, Write Tag, or similar wording.
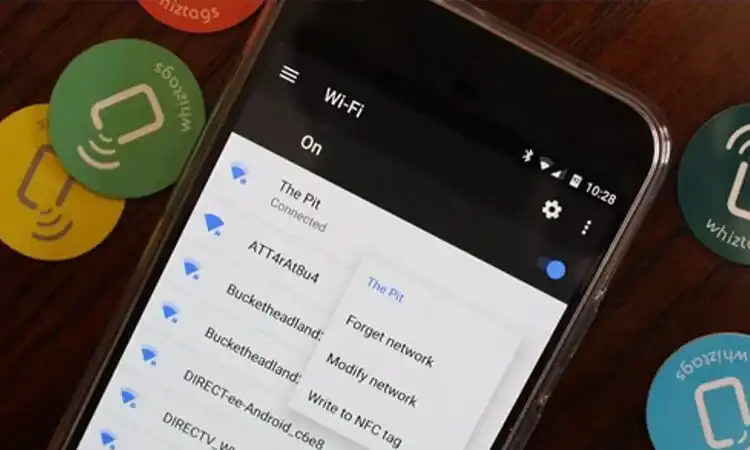
After finding the write option, follow the app’s instructions for writing the data onto the NFC tag. This typically involves placing your smartphone or device in close proximity to the tag (usually within 1-2 cm) and waiting for the app to confirm the successful writing of data.
Step 9: Test the NFC Tag
After writing the Wi-Fi record onto the NFC tag, it is crucial to test its functionality to ensure that it works correctly. To do this:
- Disable Wi-Fi on your smartphone or device.
- Ensure that NFC is enabled on your device.
- Tap your device on the programmed NFC tag.
- Your device should automatically connect to the Wi-Fi network without manual input of the password.
If the NFC tag does not perform as expected, double-check the Wi-Fi network information entered in the app and attempt to write the data onto the tag again.
Step 10: Secure the NFC Tag (Optional)
If you desire to prevent others from modifying the Wi-Fi information on the NFC tag, you can set a password or lock the tag. Most NFC tag-writing apps offer this functionality built-in. It is critical to note that locking an NFC tag is a permanent action, & you will be unable to modify the tag’s contents once it is locked.
To lock the NFC tag, follow the instructions provided by your specific NFC tag-writing app. Typically, this involves selecting the programmed Wi-Fi record, choosing a Lock or Protect option, and confirming your decision.
Step 11: Place the NFC Tag in a Convenient Location
Now that your NFC tag is programmed and tested position it in a convenient location where users can effortlessly access it with their NFC-enabled devices.
Step 12: Inform Users/Friends About the NFC Tag
You should inform users about the availability of the NFC tag for connecting to the Wi-Fi network. You can accomplish this through signage, verbal communication, or written instructions provided to guests or employees.
By following these steps, you have successfully programmed an NFC tag to connect to Wi-Fi, simplifying the process for users & eliminating the need for manual input of network information.
Overall, NFC tags are convenient and user-friendly to connect to Wi-Fi networks by simply tapping an NFC-enabled device. If you follow this guide to the letter, you can effortlessly program NFC tags to establish Wi-Fi connections. For more information about the uses of NFC, click here: 29 Thoughts About Nfc Tags Uses.
This will enhance accessibility for users and minimize the necessity for manually entering network details. With NFC technology gaining more prevalence, now is an ideal time to embrace this seamless approach to Wi-Fi connectivity.